What happens when you compile a program?
A primer on the different processes that happen when you compile a program
Hi, in this post I’ll go through what happens when you compile a program. It’s going to involve a little bit of C, Assembly, and some very basic linux tooling. The main idea is that you get out of here with a deeper understanding of what happens behind the scenes.
This type of knowledge is not very useful for most people, but if you like to know how things work, I think you’ll enjoy at least some of the things I’ll expose here.
I’ll do this with Linux in mind, but the same ideas can be transposed to how it works in Windows.
I have taken a lot of inspiration from the Practical Binary Analysis book by No Starch Press, written by Dennis Andriesse, mainly on how to structure these ideas in a concise way. I highly recommend the book if you want to go deep into binary analysis but keep in mind, it’s not a book you’ll go through in a weekend, it takes years to master everything in there, but that’s beside the point of this post. Let’s go!
Compilation?
Ok, the first step here is to actually understand what compiling a program means.
Computers don’t understand code the way we write it; at a deep level, it’s all about electrical signals and flip-flops, however, we can go one layer above this and understand that this language can be represented by a series of 0s and 1s, or in other words, binary.
To these series of 0s and 1s that the computer understands, we call machine code. As the name implies, this is not something humans can easily read, except for a few wizards who started doing it when dinosaurs were still around.
So, how is it possible that we can write code in a human-readable form so that it can be run by the computer? Compilation is the key here. This is essentially the process of converting our hopefully bug-free code into something the machine can understand, i.e.; machine code, or as commonly referred to in the streets, “the binary”.
Now, compilation is normally not as simple as taking some C (or other languages) code directly into 0s and 1s. We could do this, but it would be incredibly difficult to maintain the level of progress we have today because we would have to create very complicated software for every single language out there, which is not feasible. So, compiling code is a multi-step process, which I’ll go through in this post.
Let’s take advantage of a good compiler that comes pre-installed on pretty much all linux distributions, gcc, which stands for “The GNU Compiler”. By the way, GNU is an actual operating system, based on UNIX, just like Linux!
Compiling C code
Take this code as an example:
#include <stdio.h>

#define FORMAT "%s"
#define PRINTSTRING "Hello World, how's it going?\n"

int main() {
    printf(FORMAT, PRINTSTRING);
}
The code above will just print the string “Hello World, how’s it going?” to the console.
The line
#include <stdio.h>just means “I want you to include the code contained in this library since I’ll use it in my program”, in this case, the printf() function comes from here.
These lines
#define FORMAT "%s"
#define PRINTSTRING "Hello World, how's it going?\n"
Are called macros. The important thing is to understand that they are not actual code that will be run, but rather things that allow programmers to have a little bit more flexibility when coding. In this case, we’re defining a format and the string we want to print as macros. I’ll explain why I put those there soon.
The rest of the code
int main() {
    printf(FORMAT, PRINTSTRING);
}
is just a normal print to the console. Every language out there has this, so even if you don’t know C, you can understand the idea (I hope).
If we want to compile this code, all we have to do is (assuming the file name is main.c):
$ gcc main.c -o main$ ./main
Hello World, how's it going?That’s cool, but if you’re reading this post I bet you’ve already done similar things and this doesn’t impress you at all. So let’s get deeper in the next sections, to see what’s happening under the hood.
Compilation Steps
When you run that gcc main.c -o main line of code, what happens inside is actually extremely complicated and it involves multiple steps.
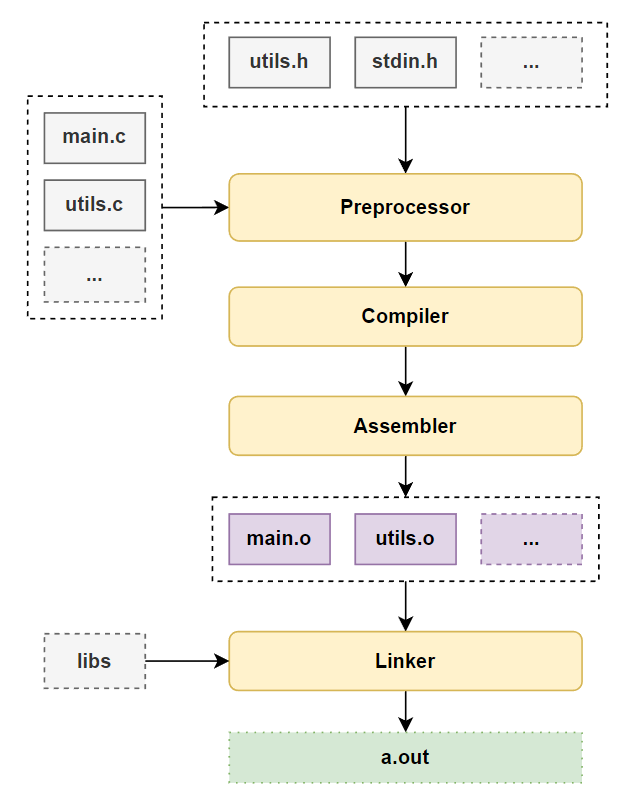
The high-level view is as follows:
- Your .c files, alongside any headers, are fed to something called a Preprocessor
- The output of the Preprocessor is passed through to the compiler, which will produce assembly code
- The output of the compiler, that is, the assembly code, is passed to something called an Assembler. Here, the output will be one or more object files. These are binaries with executable code (not quite, but close enough).
- Because we may have multiple object files and/or some external dependencies, these are passed to a Linker
- After linking, you got your final executable!
As an image is worth more than a 0b1111101000 words, below’s a diagram for this process.
Preprocessor
In this step, you feed the Preprocessor .c code and the output will still be .c code. So, what changes? Well, remember these lines?
#include <stdio.h>

#define FORMAT "%s"
#define PRINTSTRING "Hello World, how's it going?\n"
The preprocessor will expand these into the output. Basically, it will insert all the code in the stdio.h header file into the output, as well as replace every single usage of FORMAT and PRINTSTRING by "%s" and "Hello World, how's it going?\n", respectively.
We can see this in action using GCC, which is why I chose it! I urge you to RTFM with man gcc, but all you have to do here is pass the -E flag to the compiler, alongside an optional -P so the output isn’t super verbose.
$ gcc -E -P main.cRunning the line above will print a lot of code to the console, it should look something like this:
...
...
extern int getchar_unlocked (void);
extern int fgetc_unlocked (FILE *__stream);
extern int fputc (int __c, FILE *__stream);
extern int putc (int __c, FILE *__stream);
extern int putchar (int __c);
...
...

int main() {
    printf("%s", "Hello World, how's it going?\n");
}
Basically, at the top of the file, you will find a lot of function signatures and type definitions. Those are all from the stdio.h header file. You can easily check this by looking into the actual stdio.h file on your machine. If you’re using linux (which you should), you can find it at /usr/include/stdio.h.
Next, remember those macros I mentioned? Look at the printf() statement after the Preprocessor did its thing and compare it to before. It replaced our FORMAT and PRINTSTRING with the right stuff, as expected.
So, now you should have a grasp of what preprocessing is, although it does much more, such as taking care of your “preprocessor conditionals”, etc… you can read more about this here.
Compilation
In this step the Compiler will take the output of the Preprocessor and turn it into assembly code. Please note that although we call GCC “The Compiler”, there’s an actual step in there that’s technically called compilation. I know it’s confusing but it is what it is.
We can tell the compiler to give us our assembly code, to do this, just run GCC with the -S flag, as such:
$ gcc -S -masm=intel main.cThe -masm=intel means we want the output to use the Intel syntax, as opposed to AT&T, for example. This syntax is the simplest to read in my opinion, so I’m using it to illustrate this process.
After running the command above, a new file should emerge, called main.s. the .s means it’s an assembly file, by convention (remember, extensions don’t mean much in linux, it’s all files).
The output of main.s is:
        .file   "main.c"
        .intel_syntax noprefix
        .text
        .section        .rodata
.LC0:
        .string "Hello World, how's it going?"
        .text
        .globl  main
        .type   main, @function
main:
.LFB0:
        .cfi_startproc
        endbr64
        push    rbp
        .cfi_def_cfa_offset 16
        .cfi_offset 6, -16
        mov     rbp, rsp
        .cfi_def_cfa_register 6
        lea     rdi, .LC0[rip]
        call    puts@PLT
        mov     eax, 0
        pop     rbp
        .cfi_def_cfa 7, 8
        ret
        .cfi_endproc
.LFE0:
        .size   main, .-main
        .ident  "GCC: (Ubuntu 9.4.0-1ubuntu1~20.04.1) 9.4.0"
        .section        .note.GNU-stack,"",@progbits
        .section        .note.gnu.property,"a"
        .align 8
        .long    1f - 0f
        .long    4f - 1f
        .long    5
0:
        .string  "GNU"
1:
        .align 8
        .long    0xc0000002
        .long    3f - 2f
2:
        .long    0x3
3:
        .align 8
4:
Now we’re talking! There’s quite a lot to unpack there. For a very simple primer on assembly you can read a previous blog post of mine on how to write a file like a maniac. There’s a section there dedicated to assembly that may be useful. You can find it here.
The first two lines
.file   "main.c"
.intel_syntax noprefix
are kind of useless to us. The .file one is used by the compiler to know the original source file name, which is used by debuggers and the .intel_syntax noprefix makes it so the registers don’t require the ’%’ prefix.
I’ll briefly go over the rest now, picking some blocks and explaining them (the most relevant)
        .section        .rodata
.LC0:
        .string "Hello World, how's it going?"
This one is where our constants will reside. The .section .rodata stands for “Section Read Only Data”, which is where you have data that cannot be changed in runtime (otherwise an exception happens).
The .LC0 is a compiler-given label, and it’s where we’re storing said data, in this case, a .string with our “Hello …” value.
Next:
main:
.LFB0:
        .cfi_startproc
        endbr64
        push    rbp
        .cfi_def_cfa_offset 16
        .cfi_offset 6, -16
        mov     rbp, rsp
        .cfi_def_cfa_register 6
        lea     rdi, .LC0[rip]
        call    puts@PLT
        mov     eax, 0
        pop     rbp
        .cfi_def_cfa 7, 8
        ret
        .cfi_endproc
This is the actual code we wrote in C. We see the main: label specifying the program’s entry point and the rest of the code below. Special attention to that call puts@PLT call that’s used with printf(). Ignore the @PLT part for now, I’ll get to it soon.
The rest of the code can be ignored at this stage, but by all means, try to understand it if you want, although that’s out of scope for this post.
Assembler
At this point, after we have our assembly code, we’re ready to pass it through the Assembler, which will convert that into machine code. The reason we have this step and don’t go straight from C to Machine Code is that assemblers are incredibly difficult, and although converting C to Assembly is already a daunting task, it makes it easier to have this separated. Why? You may ask… Well, let’s say you’re creating a new programming language, like Go, or Rust, or C++, all you have to do is to write the means to convert that code into Assembly, which is difficult but doable since assembly is “human readable”; then you’d use an assembler to do the rest of the heavy lifting for you.
Remember we still have one step after this, the Linker, so that means we can still make the compiler stop at an early stage and spit out what we need. Call GCC like this:
$ gcc main.c -cThis will generate a new file called main.o, where the .o stands for “object file”. If you try to read this file you won’t be able to, as it’s already in a non-readable form (unless you’re a machine). You can read its bytes if you’re curious, by doing xxd -l 256 main.o (on windows, I like HxD to read binaries), which will yield the first 256 bytes of the file as hexadecimal output, as such:
$ xxd -l 256 main.o

00000000: 7f45 4c46 0201 0100 0000 0000 0000 0000  .ELF............
00000010: 0100 3e00 0100 0000 0000 0000 0000 0000  ..>.............
00000020: 0000 0000 0000 0000 2003 0000 0000 0000  ........ .......
00000030: 0000 0000 4000 0000 0000 4000 0e00 0d00  ....@.....@.....
00000040: f30f 1efa 5548 89e5 488d 3d00 0000 00e8  ....UH..H.=.....
00000050: 0000 0000 b800 0000 005d c348 656c 6c6f  .........].Hello
00000060: 2057 6f72 6c64 2c20 686f 7727 7320 6974   World, how's it
00000070: 2067 6f69 6e67 3f00 0047 4343 3a20 2855   going?..GCC: (U
00000080: 6275 6e74 7520 392e 342e 302d 3175 6275  buntu 9.4.0-1ubu
00000090: 6e74 7531 7e32 302e 3034 2e31 2920 392e  ntu1~20.04.1) 9.
000000a0: 342e 3000 0000 0000 0400 0000 1000 0000  4.0.............
000000b0: 0500 0000 474e 5500 0200 00c0 0400 0000  ....GNU.........
000000c0: 0300 0000 0000 0000 1400 0000 0000 0000  ................
000000d0: 017a 5200 0178 1001 1b0c 0708 9001 0000  .zR..x..........
000000e0: 1c00 0000 1c00 0000 0000 0000 1b00 0000  ................
000000f0: 0045 0e10 8602 430d 0652 0c07 0800 0000  .E....C..R......
You can see that our “Hello World” string is there somehow, which makes sense, but the rest is a bunch of gibberish, impossible to read like this.
When you assemble a file like we just did, you’re creating an ELF file, which stands for “Executable and Linkable Format”. This is the standard linux format for executables, as opposed to the PE-Format of Windows. You can see that at the top of the xxd output, there’s a string specifying “ELF” as the format, but that’s not enough. If you want to make sure, you can run the file tool, which you should have on any linux distribution, and see what it tells you:
$ file main.o

main.o: ELF 64-bit LSB relocatable, x86-64, version 1 (SYSV), not stripped
Ok, so this tells us that the Assembler created an ELF file, with a 64-bit architecture. The LSB means “Least Significant Byte”, which is just the way numbers will be stored in the program. I’ll explain the “not stripped” part in the next section.
Finally, you’ll see the word “relocatable”. When you run your code, those instructions will be stored in memory, this directive just means that you’re dealing with something that can be relocated to any memory address and everything will remain within context, i.e., you’re not breaking any assumptions in the code. These relocatable files tell you you’re dealing with object files that aren’t executable per si. Why are these relocatable files, well, relocatable? It’s quite simple, when you’re assembling things into object files, they are all done independently, which means that, if you have a call from the code present in one object file to a function (or other things) of another object file, it has no way of knowing where that address is in memory, therefore, at this stage, these files are all marked as relocatable.
The idea here is that at the next stage, we can link all of these files together to build something executable. This includes having all the addresses ready, and so on…
Linker
Now’s the final part, the grand finale where you turn your code into something the world can execute. As this is the last part, we can just run gcc main.c -o main to complete everything and give us the final result.
So, let’s compile it and see what kind of file we actually got:
$ gcc main.c -o main
$ file main

main: ELF 64-bit LSB shared object, x86-64, version 1 (SYSV), dynamically linked, interpreter /lib64/ld-linux-x86-64.so.2, BuildID[sha1]=0dede4223b251bc42cd38d0e83891f06443a0d43, for GNU/Linux 3.2.0, not stripped
Ok, now we have new things to know about. “dynamically linked” is related to the fact we’re linking with shared libraries that are usable by everybody. Remember that assembly line we saw above with call puts@PLT? Well, that’s related to this stage and what I’ve mentioned about the object files being relocatable. PLT stands for Procedure Linkage Table and all it means is that when linking, these @PLT instructions will be replaced with the actual addresses, because at that point, our object files wouldn’t know exactly where to go for, in this case, for the puts() function from stdin.h.
TLDR on the PLT thing: It’s there as a stub, so that when the linker gets the object files, it replaces those entries with the right addresses.
The interpreter /lib64/ld-linux-x86-64.so.2 just tells us what dynamic linker is used to resolve the shared library code addresses. Remember, this is code that’s accessible by everything and everyone on the operating system.
Finally, you’ll see that “not stripped” part as well. This one is very interesting to anyone who wants to learn reverse engineering. When you don’t have your executables stripped, all the symbol information will remain intact, which means variable and function names are kept!! This is a godsend when you’re trying to figure out what something does, let me illustrate.
Run xxd on the executable first, just to see how useless it looks :)
$ xxd -l 256 main

00000000: 7f45 4c46 0201 0100 0000 0000 0000 0000  .ELF............
00000010: 0300 3e00 0100 0000 6010 0000 0000 0000  ..>.....`.......
00000020: 4000 0000 0000 0000 7839 0000 0000 0000  @.......x9......
00000030: 0000 0000 4000 3800 0d00 4000 1f00 1e00  [email protected]...@.....
00000040: 0600 0000 0400 0000 4000 0000 0000 0000  ........@.......
00000050: 4000 0000 0000 0000 4000 0000 0000 0000  @.......@.......
00000060: d802 0000 0000 0000 d802 0000 0000 0000  ................
00000070: 0800 0000 0000 0000 0300 0000 0400 0000  ................
00000080: 1803 0000 0000 0000 1803 0000 0000 0000  ................
00000090: 1803 0000 0000 0000 1c00 0000 0000 0000  ................
000000a0: 1c00 0000 0000 0000 0100 0000 0000 0000  ................
000000b0: 0100 0000 0400 0000 0000 0000 0000 0000  ................
000000c0: 0000 0000 0000 0000 0000 0000 0000 0000  ................
000000d0: f805 0000 0000 0000 f805 0000 0000 0000  ................
000000e0: 0010 0000 0000 0000 0100 0000 0500 0000  ................
000000f0: 0010 0000 0000 0000 0010 0000 0000 0000  ................
Well, it’s an ELF file alright, but I can’t figure out anything about what it does from here.
Let’s introduce a new tool, called readelf. This tool essentially parses ELF files and allows you to get certain information in a structured way. Let’s run this with the —syms argument to see the symbols of our executable:
$ readelf --syms main

Symbol table '.dynsym' contains 7 entries:
   Num:    Value          Size Type    Bind   Vis      Ndx Name
     0: 0000000000000000     0 NOTYPE  LOCAL  DEFAULT  UND
     1: 0000000000000000     0 NOTYPE  WEAK   DEFAULT  UND _ITM_deregisterTMCloneTab
     2: 0000000000000000     0 FUNC    GLOBAL DEFAULT  UND puts@GLIBC_2.2.5 (2)
     3: 0000000000000000     0 FUNC    GLOBAL DEFAULT  UND __libc_start_main@GLIBC_2.2.5 (2)
     4: 0000000000000000     0 NOTYPE  WEAK   DEFAULT  UND __gmon_start__
     5: 0000000000000000     0 NOTYPE  WEAK   DEFAULT  UND _ITM_registerTMCloneTable
     6: 0000000000000000     0 FUNC    WEAK   DEFAULT  UND __cxa_finalize@GLIBC_2.2.5 (2)

Symbol table '.symtab' contains 65 entries:
   Num:    Value          Size Type    Bind   Vis      Ndx Name
     0: 0000000000000000     0 NOTYPE  LOCAL  DEFAULT  UND
     1: 0000000000000318     0 SECTION LOCAL  DEFAULT    1
     2: 0000000000000338     0 SECTION LOCAL  DEFAULT    2
     ...
     ...
    27: 0000000000000000     0 SECTION LOCAL  DEFAULT   27
    28: 0000000000000000     0 FILE    LOCAL  DEFAULT  ABS crtstuff.c
    29: 0000000000001090     0 FUNC    LOCAL  DEFAULT   16 deregister_tm_clones
    30: 00000000000010c0     0 FUNC    LOCAL  DEFAULT   16 register_tm_clones
    31: 0000000000001100     0 FUNC    LOCAL  DEFAULT   16 __do_global_dtors_aux
    32: 0000000000004010     1 OBJECT  LOCAL  DEFAULT   26 completed.8061
    33: 0000000000003dc0     0 OBJECT  LOCAL  DEFAULT   22 __do_global_dtors_aux_fin
    34: 0000000000001140     0 FUNC    LOCAL  DEFAULT   16 frame_dummy
    35: 0000000000003db8     0 OBJECT  LOCAL  DEFAULT   21 __frame_dummy_init_array_
    36: 0000000000000000     0 FILE    LOCAL  DEFAULT  ABS main.c
    37: 0000000000000000     0 FILE    LOCAL  DEFAULT  ABS crtstuff.c
    38: 000000000000216c     0 OBJECT  LOCAL  DEFAULT   20 __FRAME_END__
    39: 0000000000000000     0 FILE    LOCAL  DEFAULT  ABS
    40: 0000000000003dc0     0 NOTYPE  LOCAL  DEFAULT   21 __init_array_end
    41: 0000000000003dc8     0 OBJECT  LOCAL  DEFAULT   23 _DYNAMIC
    42: 0000000000003db8     0 NOTYPE  LOCAL  DEFAULT   21 __init_array_start
    43: 0000000000002024     0 NOTYPE  LOCAL  DEFAULT   19 __GNU_EH_FRAME_HDR
    44: 0000000000003fb8     0 OBJECT  LOCAL  DEFAULT   24 _GLOBAL_OFFSET_TABLE_
    45: 0000000000001000     0 FUNC    LOCAL  DEFAULT   12 _init
    46: 00000000000011e0     5 FUNC    GLOBAL DEFAULT   16 __libc_csu_fini
    47: 0000000000000000     0 NOTYPE  WEAK   DEFAULT  UND _ITM_deregisterTMCloneTab
    48: 0000000000004000     0 NOTYPE  WEAK   DEFAULT   25 data_start
    49: 0000000000000000     0 FUNC    GLOBAL DEFAULT  UND puts@@GLIBC_2.2.5
    50: 0000000000004010     0 NOTYPE  GLOBAL DEFAULT   25 _edata
    51: 00000000000011e8     0 FUNC    GLOBAL HIDDEN    17 _fini
    52: 0000000000000000     0 FUNC    GLOBAL DEFAULT  UND __libc_start_main@@GLIBC_
    53: 0000000000004000     0 NOTYPE  GLOBAL DEFAULT   25 __data_start
    54: 0000000000000000     0 NOTYPE  WEAK   DEFAULT  UND __gmon_start__
    55: 0000000000004008     0 OBJECT  GLOBAL HIDDEN    25 __dso_handle
    56: 0000000000002000     4 OBJECT  GLOBAL DEFAULT   18 _IO_stdin_used
    57: 0000000000001170   101 FUNC    GLOBAL DEFAULT   16 __libc_csu_init
    58: 0000000000004018     0 NOTYPE  GLOBAL DEFAULT   26 _end
    59: 0000000000001060    47 FUNC    GLOBAL DEFAULT   16 _start
    60: 0000000000004010     0 NOTYPE  GLOBAL DEFAULT   26 __bss_start
    61: 0000000000001149    27 FUNC    GLOBAL DEFAULT   16 main
    62: 0000000000004010     0 OBJECT  GLOBAL HIDDEN    25 __TMC_END__
    63: 0000000000000000     0 NOTYPE  WEAK   DEFAULT  UND _ITM_registerTMCloneTable
    64: 0000000000000000     0 FUNC    WEAK   DEFAULT  UND __cxa_finalize@@GLIBC_2.2
The purpose of this post is not to teach you how to read all of this, because that’s most likely reserved for another post, however, you can see that now we have some “text” we can interpret. Look at line 36, it clearly shows the filename that originated the main executable file. Also, you can see, on line 61, that we have an entry point we’re familiar with, the main() function, which you can infer from:
61: 0000000000001149 27 FUNC GLOBAL DEFAULT 16 mainThis means that there’s a function (FUNC), of size 27 bytes, that will reside at the address 0x1149 in memory. Besides this entry point, we can see familiar things like the puts() symbol on line 49, which tells us that there’s probably something being printed out somewhere.
Now, the thing is, when you write a program, you may want to make it hard for people to figure your stuff out and for that, there’s “stripping”, which will strip the output of these symbols. Without the symbols, things get quite complicated to reverse engineer sometimes, especially on large applications.
If you want to strip this binary, you can run the following:
$ strip --strip-all main$ readelf --syms main
Symbol table '.dynsym' contains 7 entries:
Num: Value Size Type Bind Vis Ndx Name
0: 0000000000000000 0 NOTYPE LOCAL DEFAULT UND
1: 0000000000000000 0 NOTYPE WEAK DEFAULT UND _ITM_deregisterTMCloneTab
2: 0000000000000000 0 FUNC GLOBAL DEFAULT UND puts@GLIBC_2.2.5 (2)
3: 0000000000000000 0 FUNC GLOBAL DEFAULT UND __libc_start_main@GLIBC_2.2.5 (2)
4: 0000000000000000 0 NOTYPE WEAK DEFAULT UND __gmon_start__
5: 0000000000000000 0 NOTYPE WEAK DEFAULT UND _ITM_registerTMCloneTable
6: 0000000000000000 0 FUNC WEAK DEFAULT UND __cxa_finalize@GLIBC_2.2.5 (2)Yep, good luck with this one, you see it has WAY less information now. You can still see that it calls puts() and has a _start() function though. By the way, we usually say main() is our entry point, but who calls main()? That’s the job of the _start() function!
Linking is way more complicated and contains more “cool things” than what I’ve shown, but for now, I think you get the gist of it.
Final product
After linking there’s nothing else to do, you now have an executable that you can run, as such:
./main

Hello World, how's it going?
This is it for now, I may do another post in the future where we go through the insides of the object files and see how they “merge” together when linking, but for this one, the idea was to give a brief overview of what happens behind the scenes, at a semi-high level.
If you’ve made it here, thank you and bye.