Simple Enough Analysis of WannaCry Ransomware
An analysis of the famous WannaCry ransomware
Introduction
On May 12, 2017, a new variant of the “WanaCrypt0r/WCry” ransomware began circulating and quickly infected tens of thousands of systems around the world, eventually reaching critical mass and impacting more than 100 countries.
WannaCry exploited a critical vulnerability in Microsoft’s Server Message Block (SMBv1) protocol, patched in MS17-010. The exploit, known as “EternalBlue,” allows remote code execution over TCP port 445 and was part of a toolset stolen from the NSA. It targeted Windows systems, including XP, Vista, 7, 8, 10, and Server editions.
In this article, I show the process one can take to analyze such dangerous malware, from static analysis to actually arming and running it on a sandboxed system.
You will find many posts showcasing this process, and this might just be another one, but I decided to do this writeup as it was part of my learning journey. It’s a complicated piece of software, but one that a single analyst can tackle, which is why it’s such a great knowledge validator for us analysts.
Setup and Analysis Environment
Lab Preparation
A good portion of malware analysis involves running the sample, but obviously you wouldn’t run it on your own machine… right? This is why one needs to set up a lab environment for these kinds of endeavors.
A common approach is to have a couple of virtual machines running: one for host-based indicators (i.e., things that happen on the machine where the malware is executed) and another VM for network-based indicators, where we monitor traffic from the attacked box to the web by simulating internet access.
In this writeup, I’ll use the following images:
- Flare-VM (link): This is a collection of software installation scripts for Windows, which allow us to analyze and run malware in an environment with all the tools we need.
- Remnux (link): A Linux distribution designed for malware analysis.
For both of the above images, I’ll spare the installation details, as both have proper documentation you can follow.
One important note: it is critical to set both virtual machines’ network adapters to Host-only on a custom network so the malware has no way of being dangerous outside of the virtual environment.
Acquisition
I don’t want to post links to malware on my site. If you want to follow along or do it by yourself, you can download it from reputable sources such as vx-underground or others. Please follow all precautions—this is a dangerous piece of malware and it might absolutely wreck your computer, just like it did in 2017.
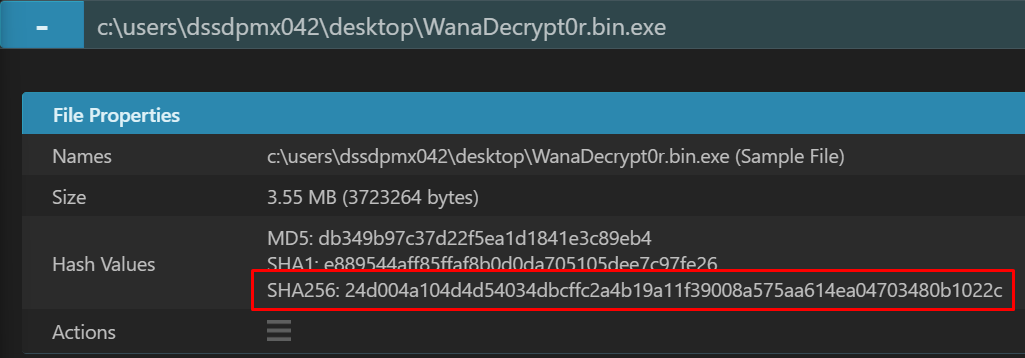
One important detail, since you can’t trust anyone on the internet, is to always validate software or malware hashes before analysis so we’re sure we’re dealing with the right sample. The SHA256 hash for WannaCry is 24d004a104d4d54034dbcffc2a4b19a11f39008a575aa614ea04703480b1022c. You can confirm this on VirusTotal.
Notes to the Reader
In this post, I won’t necessarily teach or provide detailed learnings on the tools I’m using, as that would be a book in itself. Instead, I’ll provide a general thought process on how these things can be done manually and why, leading to results that bring us closer to understanding what a malware sample is doing.
Obviously, in hindsight, we know we’re dealing with ransomware, but approach it as if a sample just emerged and people are complaining about a “virus”—what does it actually do?
I will separate the rest of this post into two main sections, Static Analysis and Dynamic Analysis, gathering indicators as we move through to the end, where I synthesize everything into one neat ELI5-style (not quite, but close) explanation of what it does.
Let’s get it.
Analysis
Static Analysis
Hashes
First things first—as mentioned previously, we need to confirm the hash(es) of the malware sample we’re given (or that we download in this case). You can look in multiple places for this; I like VMRay, where you can find the hashes for the malware here.
Then, we confirm in our Flare-VM with sha256sum {path}:

We can see it matches, meaning we’re good to proceed:
Note: You can also take the MD5 and SHA1 hashes if you want, but nowadays you’ll be able to match SHA256 easily. Either way, especially when you’re looking into VirusTotal for your collected hashes, try all of them until you find a result—or not.
If you check the hash against VirusTotal, you get more confirmation:
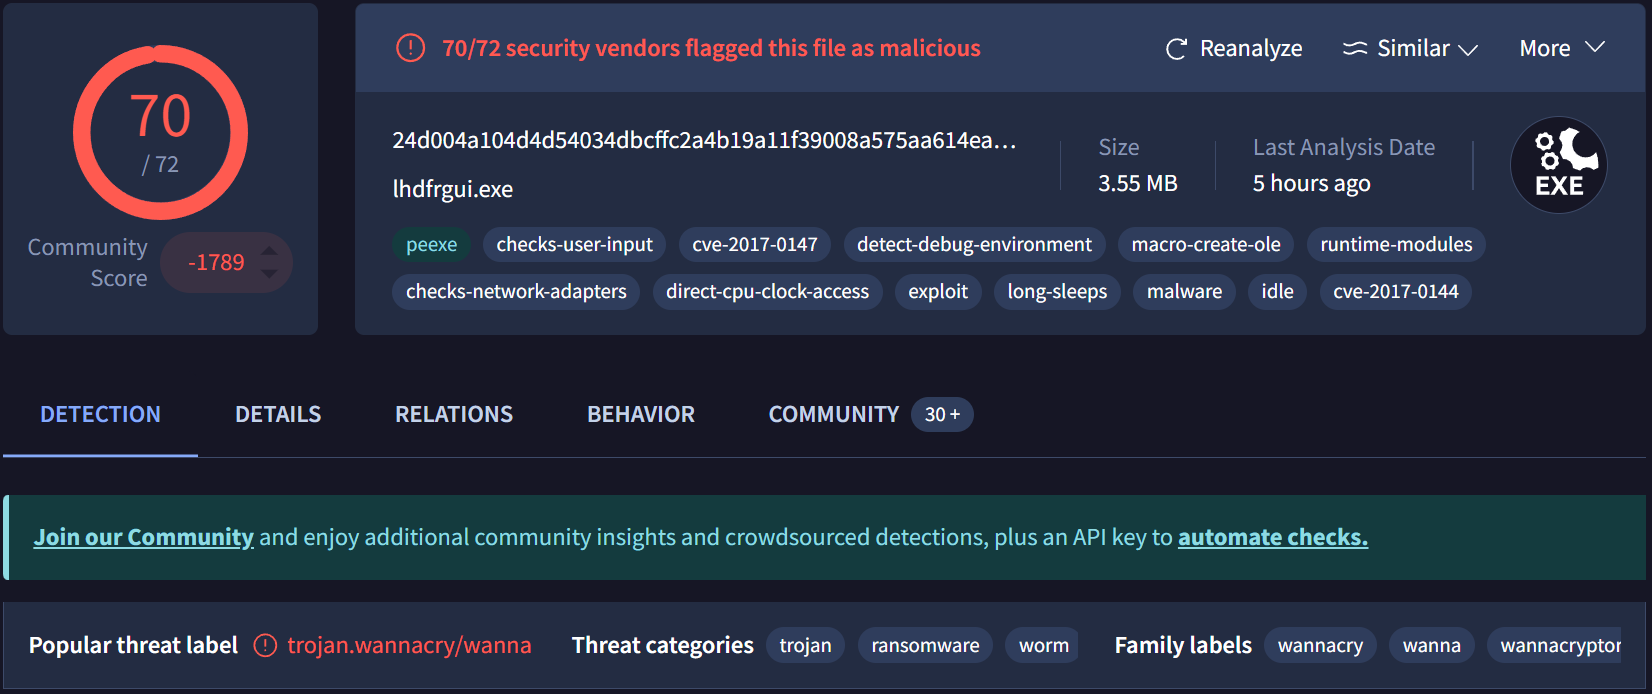
It lights up like a Christmas tree—always a strong indicator that we have something interesting to dissect (morbid, but true in reverse engineering terms).
Strings!
One thing we commonly do is check for potentially interesting strings in the sample. Often, they allow us to see callback domains that are not obfuscated, passwords, system calls, and more.
It costs almost nothing and we can always do it, even if it doesn’t yield results—it’s part of the tedious process of reverse engineering.
floss and strings are good tools for this. In this sample, I expect a really large output, so I’ve piped the floss output to a text file with floss {path} > out:

Checking the output, we see a bunch of extracted strings. The file has approximately 45,000 lines—no realistic way of going through it manually—but even a quick pass reveals some red flags:
GetTickCount
QueryPerformanceCounter
QueryPerformanceFrequency
GlobalFree
GlobalAlloc
InitializeCriticalSection
LeaveCriticalSection
EnterCriticalSection
InterlockedDecrement
CloseHandle
TerminateThread
WaitForSingleObject
InterlockedIncrement
GetCurrentThreadId
GetCurrentThread
ReadFile
GetFileSize
CreateFileA
MoveFileExA
SizeofResource
LockResource
LoadResource
FindResourceA
GetProcAddress
GetModuleHandleW
ExitProcess
GetModuleFileNameA
LocalFree
LocalAlloc
KERNEL32.dll
CryptAcquireContextA
CryptGenRandom
StartServiceA
CloseServiceHandle
CreateServiceA
OpenSCManagerA
SetServiceStatus
ChangeServiceConfig2A
RegisterServiceCtrlHandlerA
StartServiceCtrlDispatcherA
OpenServiceA
ADVAPI32.dll
WS2_32.dll
??1_Lockit@std@@QAE@XZ
??0_Lockit@std@@QAE@XZ
MSVCP60.dll
GetPerAdapterInfo
GetAdaptersInfo
iphlpapi.dll
InternetCloseHandle
InternetOpenUrlA
InternetOpenA
WININET.dll
If you look at the above, you see references to calls such as CreateFileA and functions that imply some interesting behavior, like ??0_Lockit@std@@QAE@XZ. FLOSS also gives us something useful—the FLOSS STACK STRINGS section—where we can see indicators suggesting the use of the SMB protocol:
──────────────────────────
FLOSS STACK STRINGS (15)
──────────────────────────

SMBu
/K__USERID__PLACEHOLDER__
PIPE
SMBr
PC NETWORK PROGRAM 1.0
LANMAN1.0
Windows for Workgroups 3.1a
LM1.2X002
LANMAN2.1
NT LM 0.12
SMBs
SMB2
Windows 2000 2195
Windows 2000 5.0
\192.168.56.20\IPC$
Now we know the sample takes advantage of Windows APIs to write files, references crypto libraries, and contains strings implying SMB interaction.
PE Analysis
Windows executables come in the form of PE files, or Portable Executables. We can use tools such as PEStudio to get important information on the binary, such as its architecture:
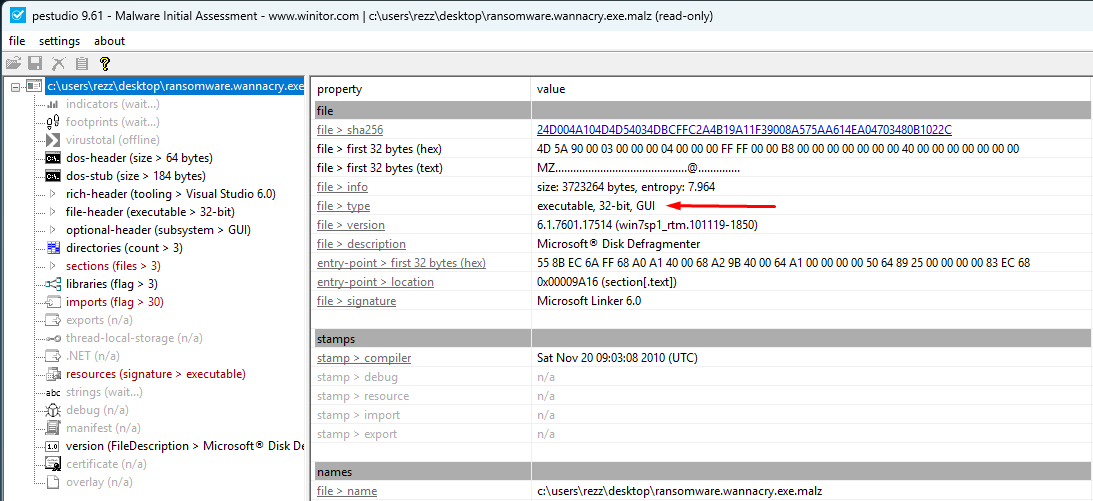
We see it’s compiled as a 32-bit executable. One of the strengths of PEStudio is that it parses the entirety of the PE header, allowing us to quickly identify hints such as whether the binary is packed.
We’ve already seen some of it from the output of floss, but another great feature of PEStudio is the imports table:
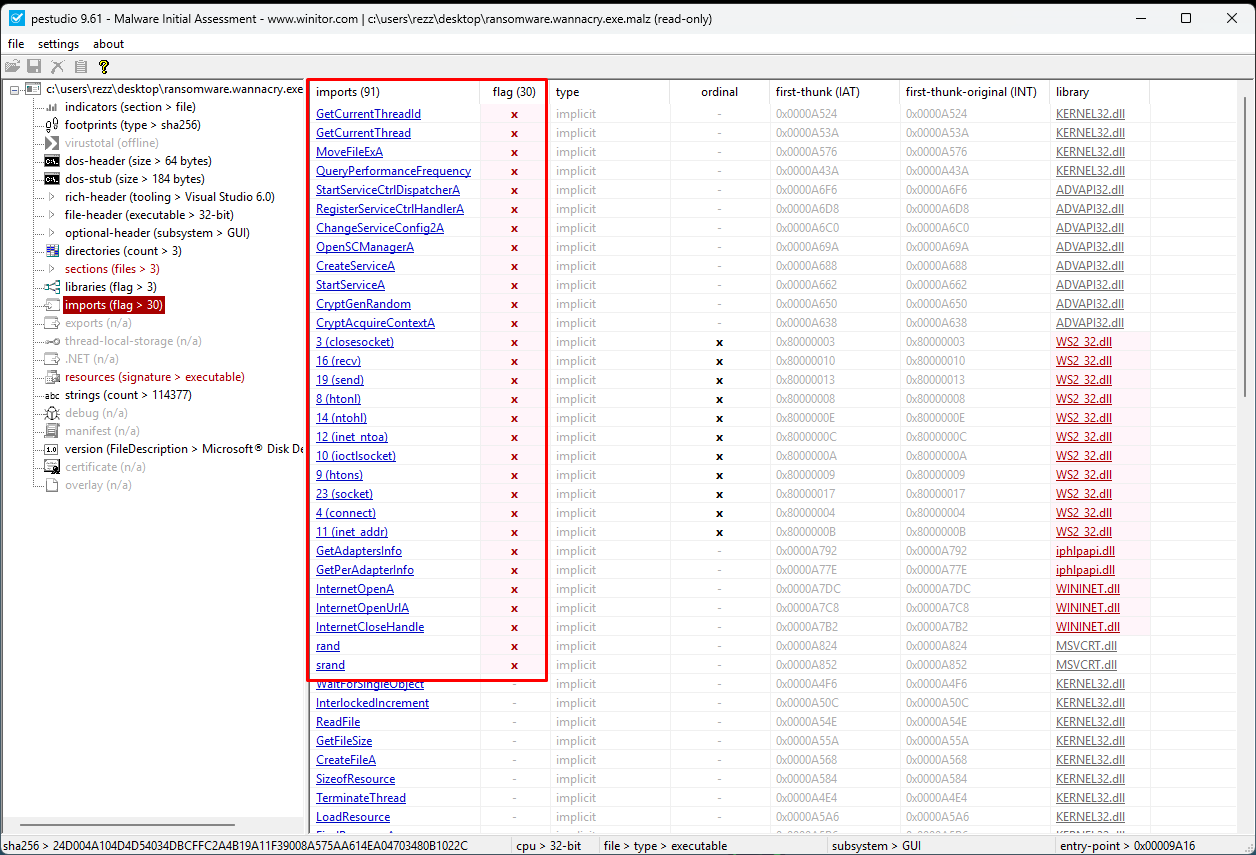
We see a number of flagged imported functions from various system-level libraries. From here, we get a glimpse of what the sample is capable of—though not yet what it actually does.
Dynamic Analysis
At this point we’re ready to detonate, and we’ll do that with a couple of apps opened on the Flare-VM first: procmon and TCPView.
With procmon, we can look for activity in the filesystem and even the registry, which helps us understand what the malware does. With TCPView, we can take a look at open connections, which tell us if any persistence or outbound communication is happening on the wire.
Detonation
Now comes the fun part—detonation. Malware often implements kill-switch mechanisms, which can be quite difficult to see. One easy check is to execute the sample in a couple of different situations: one with internet access, and another without.
Obviously, we won’t expose the VM to the real internet. Instead, we use our trusty Remnux VM to simulate an entire network with INetSim. It basically simulates access to an internet connection in a closed environment, serving any URL correctly—it even “returns” files on URLs like https://REMNUX_IP/file.jpg.
Without INetSim Running
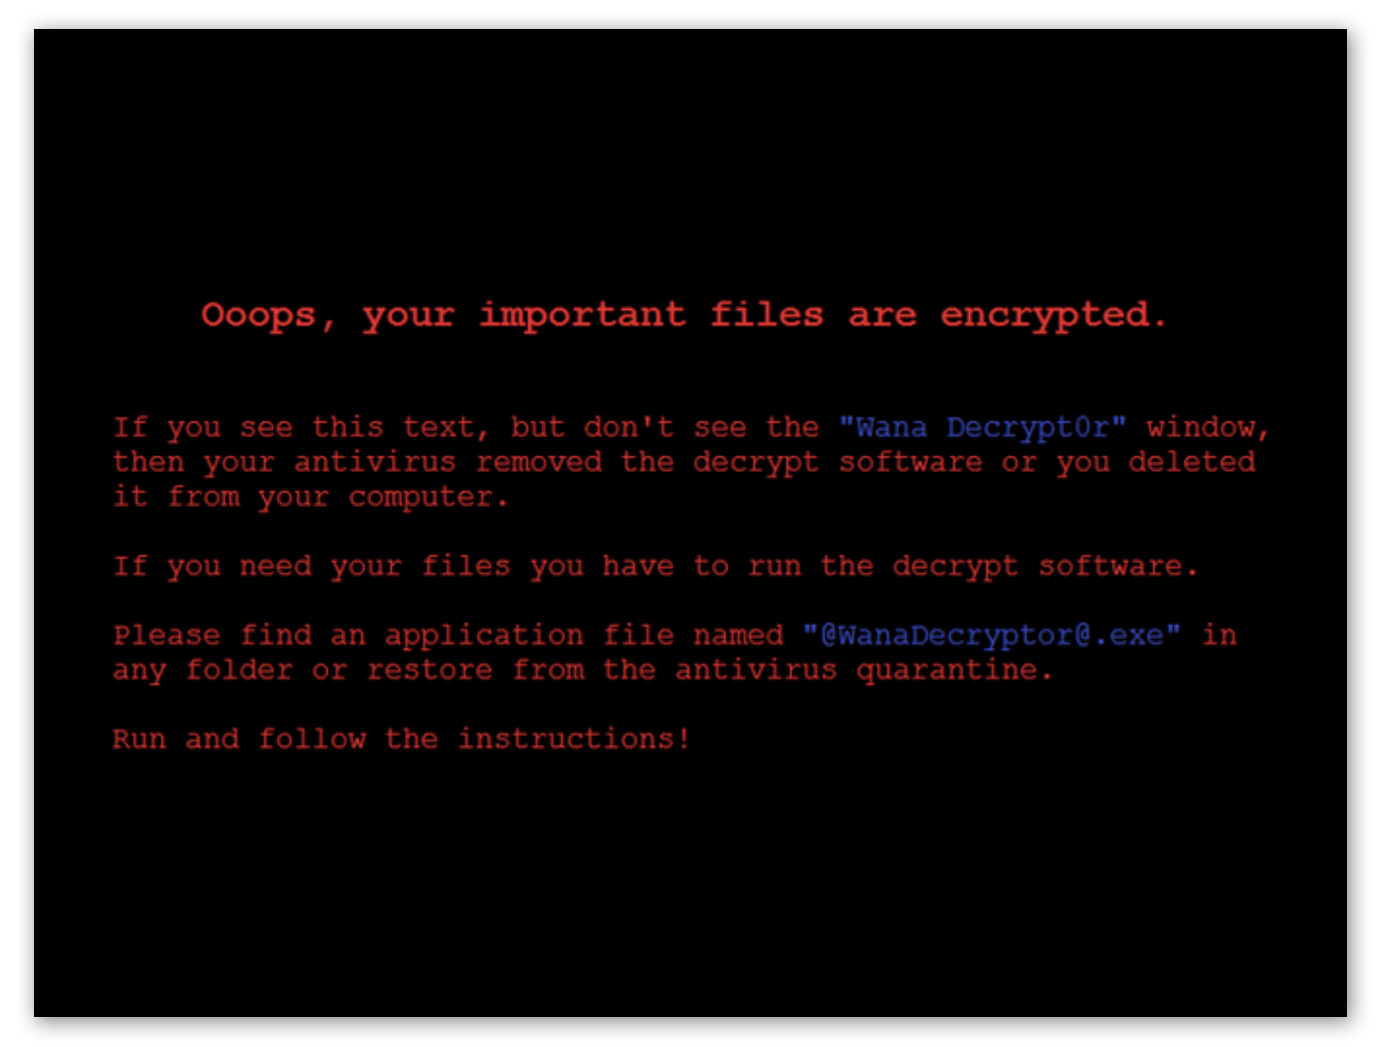
When we detonate WannaCry without an internet connection, after a few seconds we can clearly see that it worked and we’re now, effectively, pwned. We are greeted with this screen:
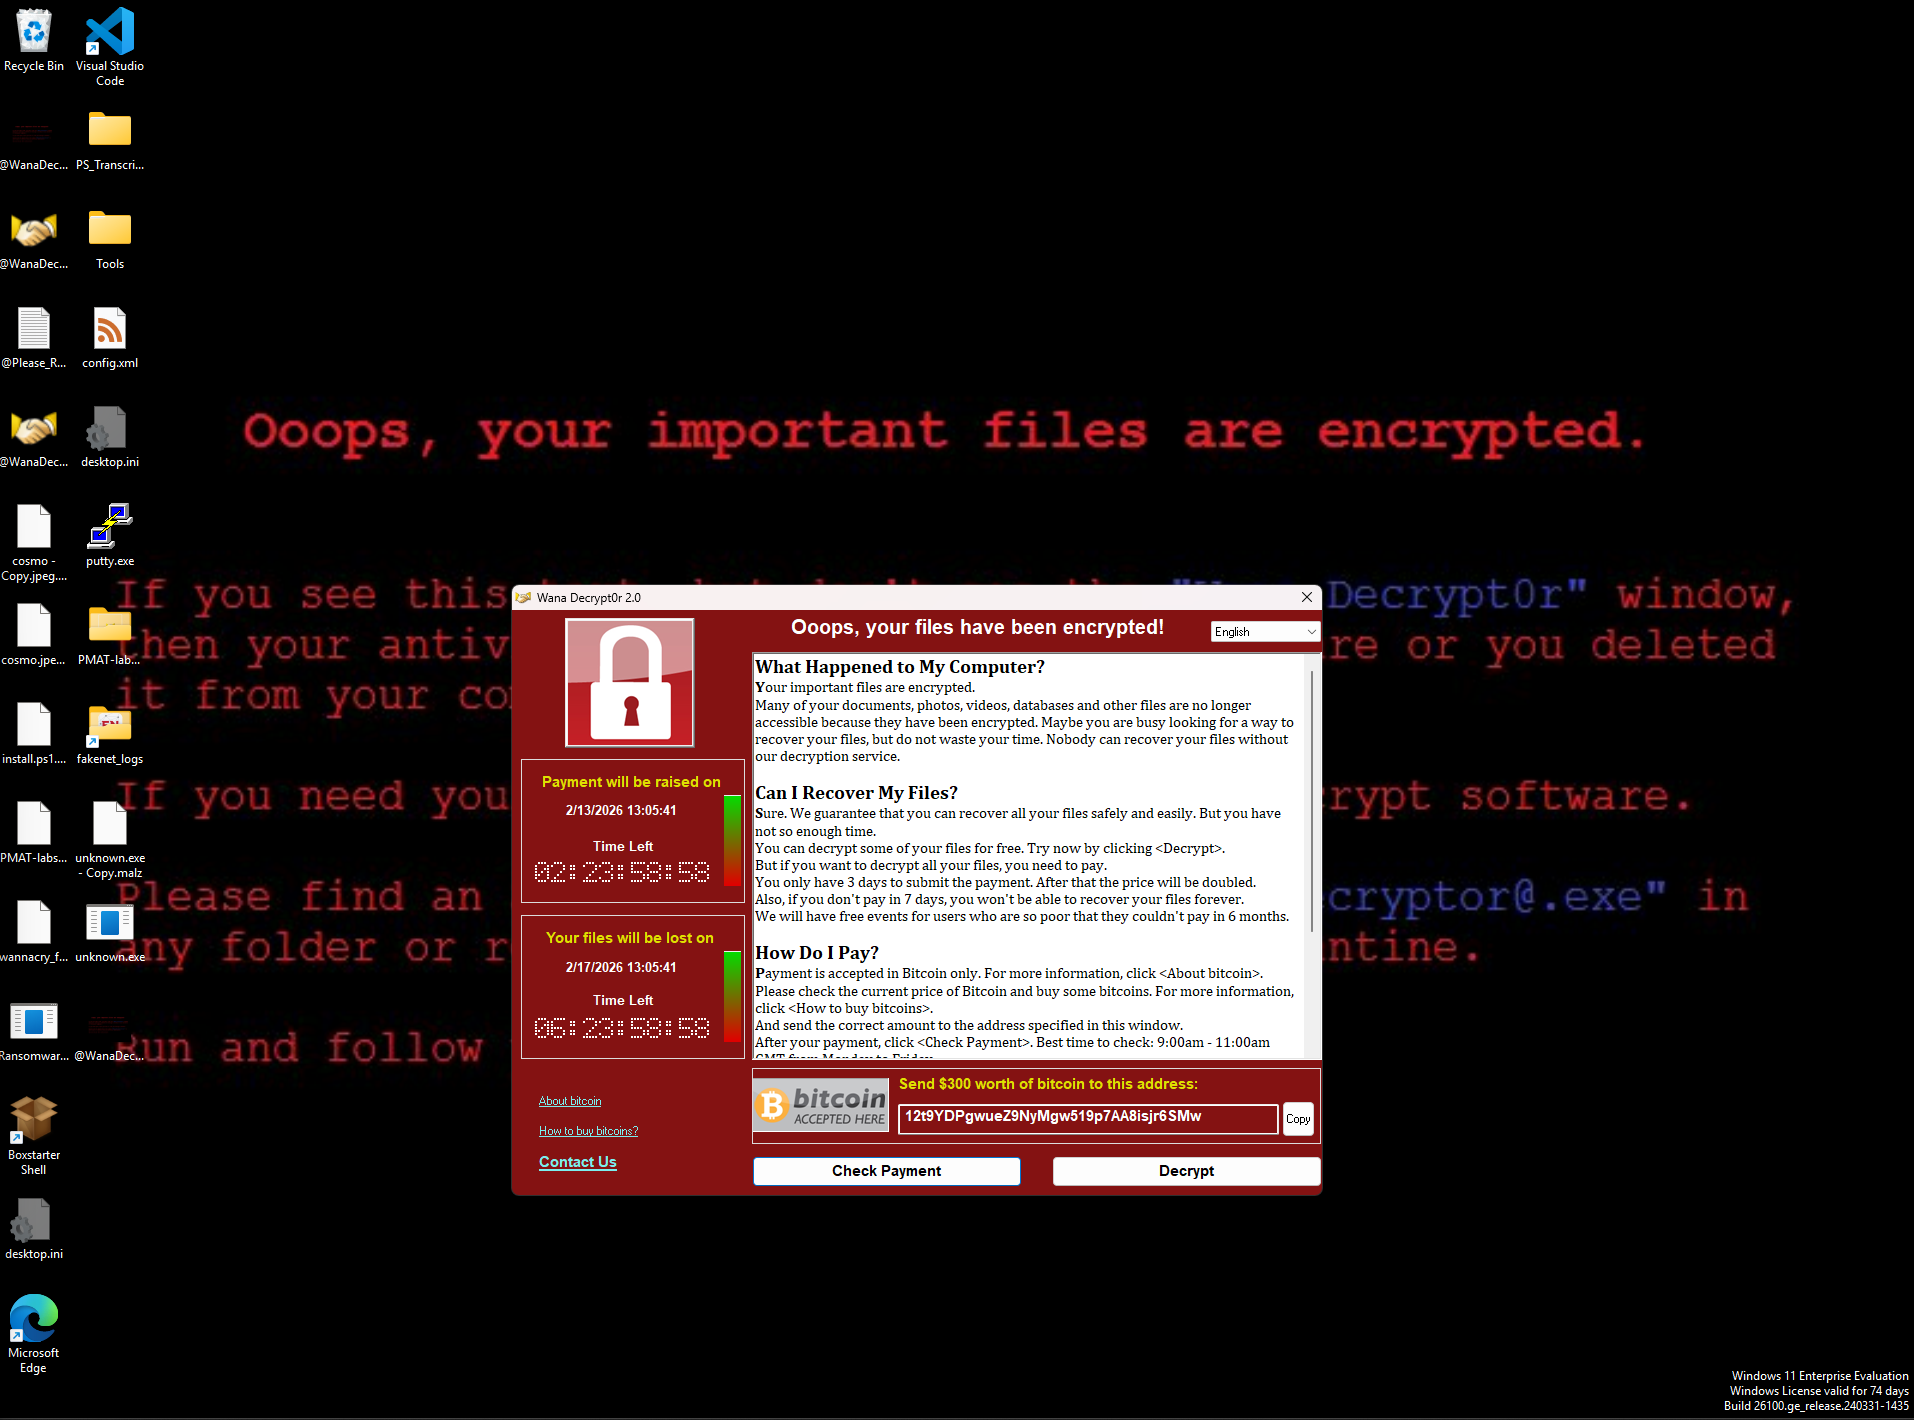
A new process is spawned called @[email protected], which is the GUI you can see above. Interestingly enough, it opens a TCP connection to localhost.

The files are also encrypted and all messed up. They get appended with the .WNCRY extension, and even if you remove that, we can’t open them because they’ve been encrypted.
If we close @[email protected], it opens again after a few seconds. Upon inspecting the output of procmon, we can see the malware creates a new file called tasksche.exe:
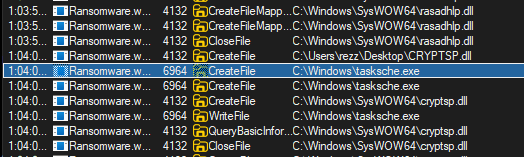
We can find it in Task Manager under the name DiskPart (32 bit). If we close this process and then close the decryptor GUI, it doesn’t reopen, suggesting DiskPart is acting as a watchdog:

Now we’re ready to move to the next phase.
With INetSim Running
Now we run INetSim on the Remnux VM and detonate the malware again. Obviously, we revert back to a known good snapshot on the Flare-VM first.
On Remnux, we open Wireshark and start listening. Once we detonate the malware, we see some interesting findings.
There is a DNS request to www.iuqerfsodp9ifjaposdfjhgosurijfaewrwergwea.com, which succeeds due to INetSim running.
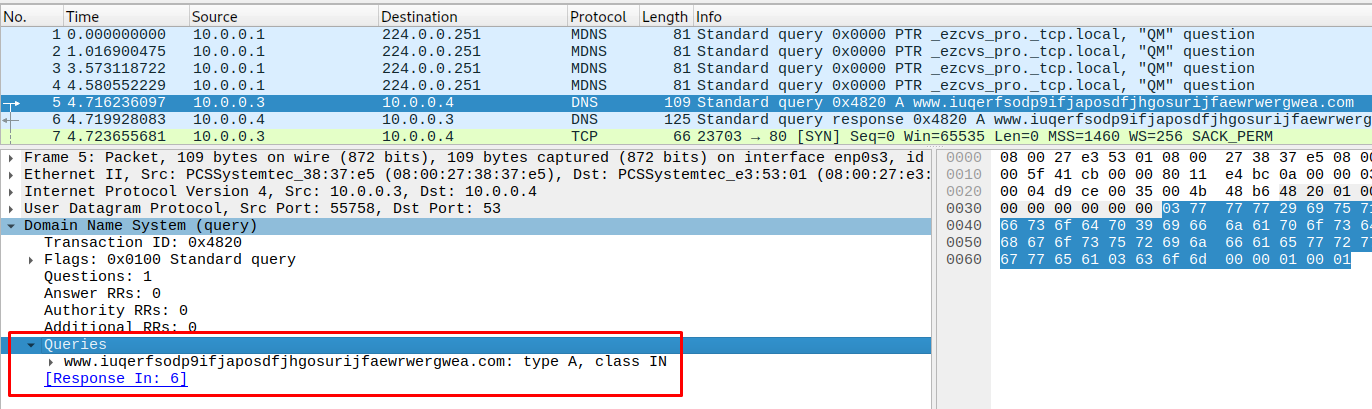
It then calls this URL with a GET request over HTTP/1.1.
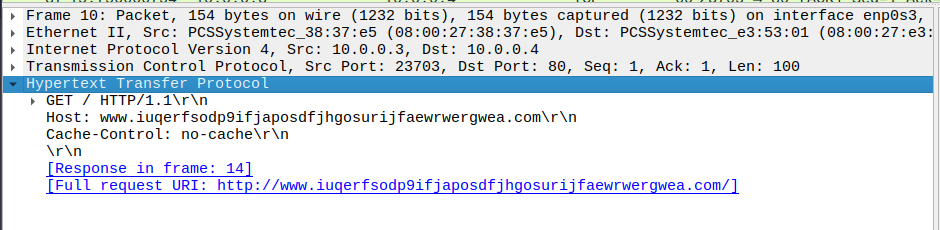
Again, it succeeds due to INetSim. Interestingly enough, nothing happens on the Flare-VM, which implies that this URL is some form of kill-switch—if it succeeds, WannaCry does not run.
If we configure INetSim’s HTTP and HTTPS ports to something other than the default ones, we can easily get WannaCry to run because that HTTP request to the canary URL will fail.
Propagation Mechanism
The reason WannaCry was so dangerous was its propagation mechanism. If we detonate the malware in a way that allows it to run (i.e., block the canary request), we can see in TCPView that it’s sending SYN requests to multiple IPs on the network over port 445 (SMB), trying to find machines it can exploit.
If WannaCry finds vulnerable devices (via EternalBlue), it spreads itself like a worm—brutally effective, as history showed.
Persistence Mechanism
WannaCry randomly generates an identifier and persists itself as a service. You can see this identifier used in ProgramData, where a folder contains the malware assets:
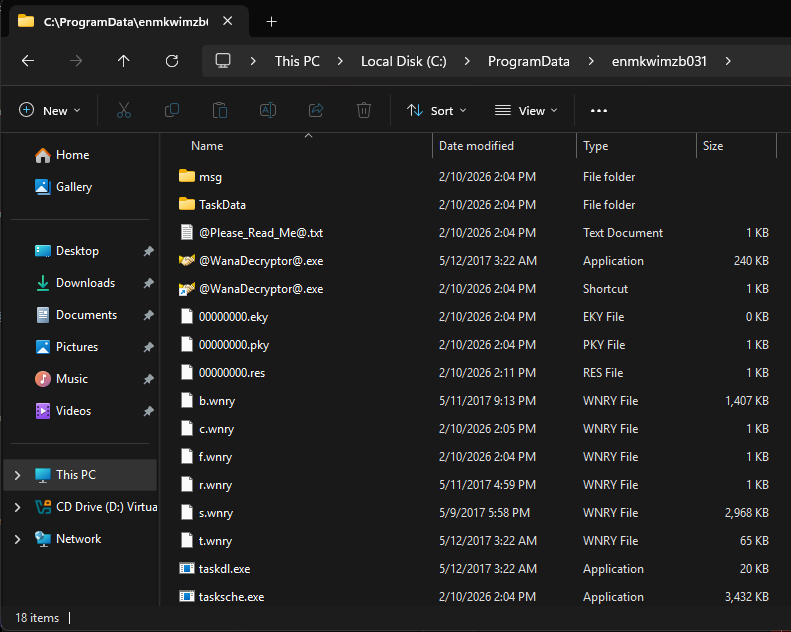
The service has the same name and ensures that when you reboot the system, the decryptor is shown again and again.

Digging Deeper
At this point, we understand a few things:
- When we detonate it, the malware calls a canary URL. If it succeeds, nothing happens—this is a kill-switch mechanism. If it fails, execution continues.
- It installs itself as a service with a randomly generated name. Files are persisted under
ProgramData\{random_id}. - It encrypts files and launches a decryptor GUI asking for money.
- If we kill the decryptor process, it reopens due to a watchdog.
- It propagates itself to vulnerable machines via EternalBlue over SMB.
From here, digging deeper means getting into the decompiled code to see what else we can uncover, particularly around encryption.
We can achieve this with any decompiler—some people use IDA, others prefer Binary Ninja, Ghidra, or even Cutter.
IDA is excellent at finding entry points and getting straight to the point with a clean graph view. If we decompile WannaCry, we can immediately see the canary logic inside the main function:
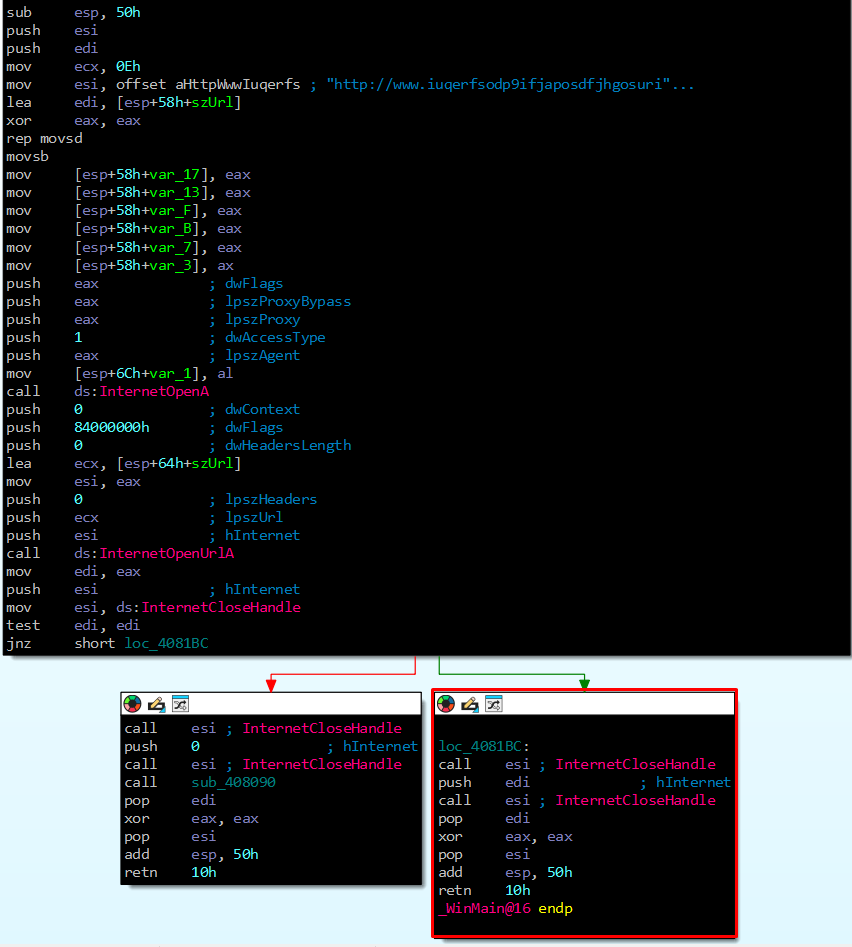
In the green arrow highlighted by the red box, you see the result of test edi, edi. When it succeeds (i.e., the result is not zero—jnz short loc_4081BC), the program simply exits.
If it fails, however, execution follows the dangerous path.
We’ll use Ghidra for this next part because it’s a little easier to follow visually. Interestingly, IDA was able to find the actual main function, whereas Ghidra was not—a reminder that knowing multiple tools is incredibly valuable.
For reference, the Ghidra output looks like:
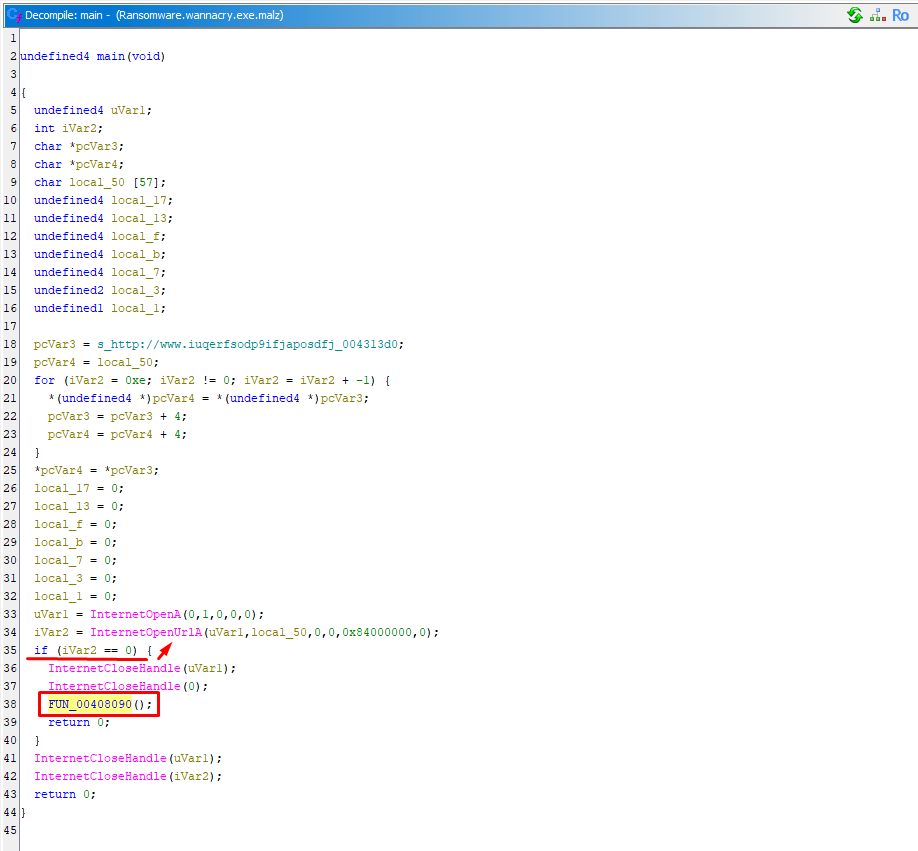
When the HTTP call fails, we enter the following function:
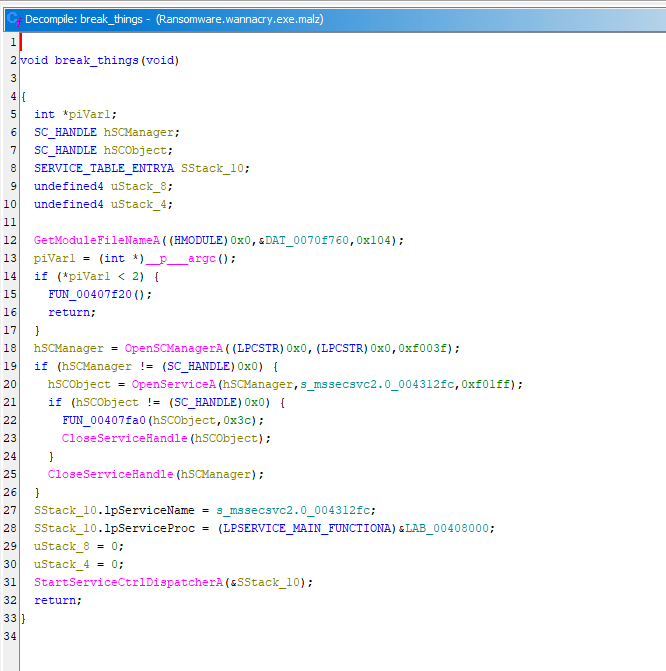
The gist is that it installs the service, copies the binary, sets registry keys, and prepares persistence. In WannaCry, the first execution sets up the service, and subsequent runs are handled by it—with the original executable even being deleted.
The line:
SStack_10.lpServiceProc = (LPSERVICE_MAIN_FUNCTIONA)&LAB_00408000;shows where the service main lives: LAB_00408000. Once the service is set up, execution moves to the following function:

Here, it checks the environment, spawning a single worker thread and then 128 more—a process that lasts roughly four minutes.
FUN_00407b90 decides whether execution continues or stops. Digging into it reveals checks for kill-switches, mutex presence (already running), privilege sanity checks, network availability, and likely more.
Looking further, we see those threads looping. Each thread executes the propagation routine(s):
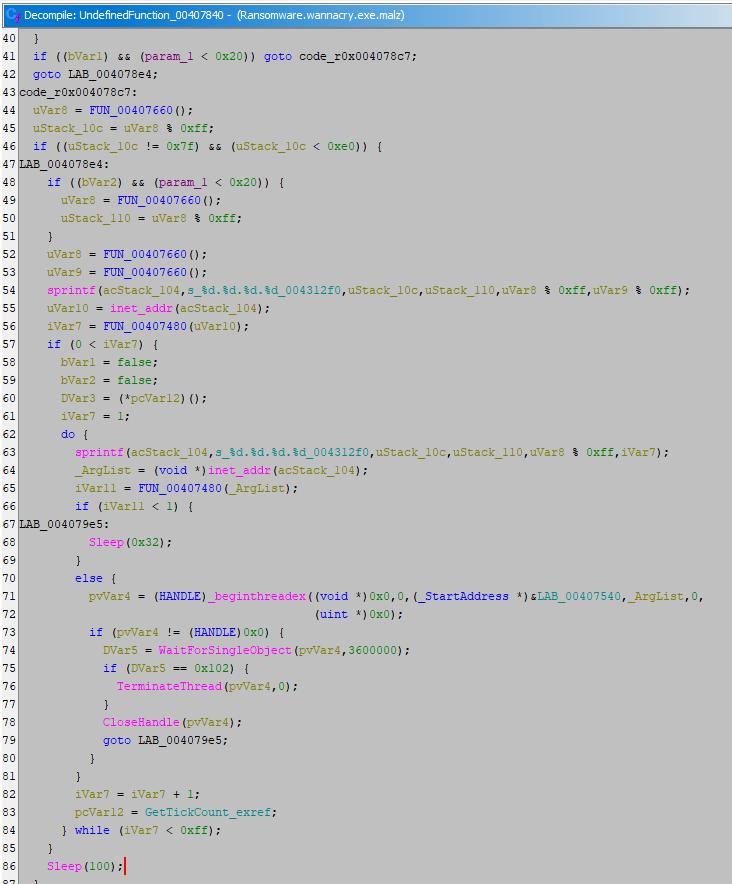
It seeds the RNG with thread-specific entropy and generates random IPv4 targets:
uStack_10c = FUN_00407660() % 0xff;  // 1st octet (A)
uStack_110 = FUN_00407660() % 0xff;  // 2nd octet (B)
uVar8 % 0xff                         // 3rd octet (C)
uVar9 % 0xff                         // 4th octet (D)
sprintf("%d.%d.%d.%d", A, B, C, D);
inet_addr(...)
It then probes the target IP with FUN_00407480(ip) and performs its SMB logic. If there’s a hit, it launches the EternalBlue exploit via FUN_00407540(target).
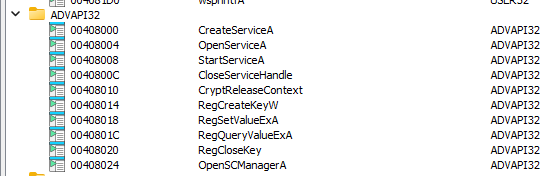
Encryption
For the encryption phase, WannaCry drops another payload that runs in headless mode. Loading tasksche.exe into a decompiler reveals crypto calls from ADVAPI32.dll:
You can see the cryptographic setup clearly in IDA:
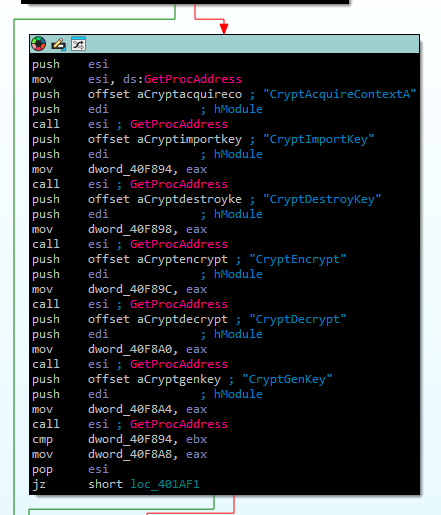
While the implementation is convoluted, the high-level behavior is straightforward.
Some files are encrypted with a hardcoded key so the victim can click “Decrypt” and see that recovery is possible. The remaining files, however, are virtually unrecoverable unless the ransom is paid.
When the encryptor runs, it uses an RSA public key belonging to the attacker. It then generates a 2048-bit RSA key pair for the victim. The victim’s private key is encrypted with the attacker’s public key and stored as 00000000.pky, after which the original private key is destroyed.
Next, one AES key is generated per file. Once encryption is complete, all AES keys are encrypted with the victim’s public RSA key.
To decrypt the files, the attacker’s private key must decrypt the victim’s private key, which in turn decrypts the AES keys and the files themselves. The only realistic path to recovery is paying the ransom.
There is also a Command & Control component used to gather information from infected targets via the TOR network, though this article does not explore that path further.
Wrapping Up
This concludes our analysis of the WannaCry ransomware, probably one of the most famous families ever released. Interestingly, it reportedly generated only around 150,000, surprisingly low given the scale of its global impact.
I hope this writeup showcased how this type of analysis is performed. In research settings, analysts often go much deeper—attaching debuggers, tracing execution paths at runtime, and patching binaries to manipulate behavior.
I’d be lying if I said I took notes on absolutely everything I found during the many hours spent analyzing this sample—fully my fault. Had I done so, maybe you’d have that deeper code dive already, but we work with what we have.
Anyway, hope you enjoyed it. Stay safe, and please don’t detonate malware on your local machines.